Invoicing is an essential part of freelancing, regardless of what industry you’re in. After all, your clients need to pay you correctly and on time for all your hard work! But how do you make an invoice as a freelancer?
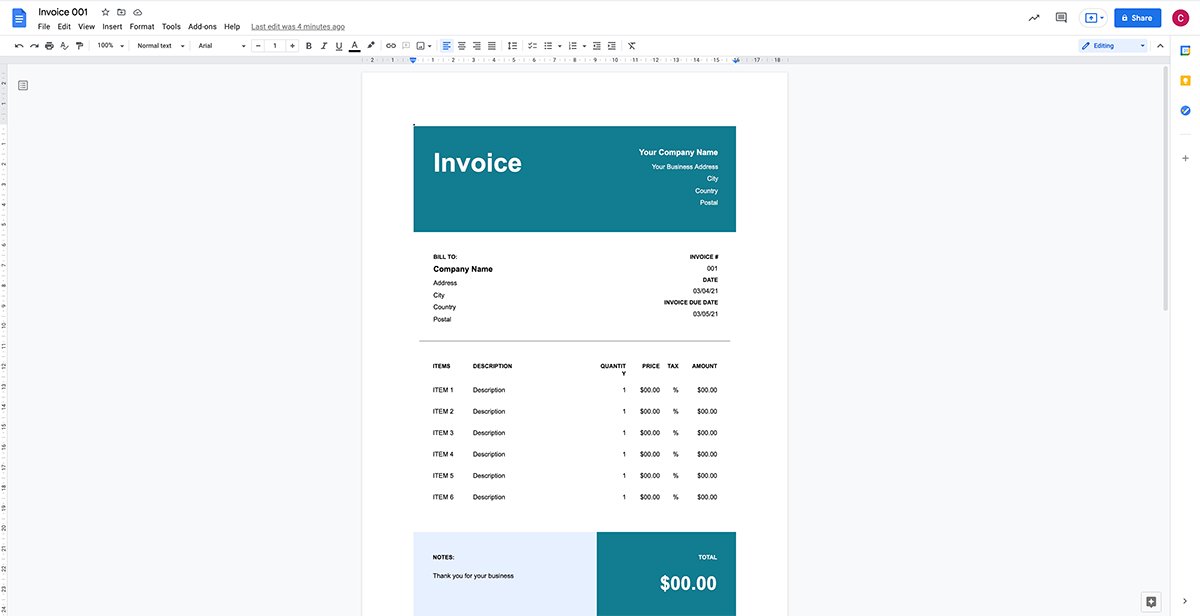
To make an invoice as a freelancer, you need to include:
- Title
- Your name and information
- Client’s name and information
- Invoice date
- Invoice number
- List of services provided
- Total amount due
- Payment details
- Thank you note
In this article, I’ll take a closer look at what you need to include on an invoice. I’ll explain why invoices are so important for freelancers, talk you through the steps to create them, and then discuss some of the best invoicing tools out there.
Do You Need To Invoice As A Freelancer?
You should use invoices as a freelancer, and indeed many clients will require you to send them an invoice for them to pay you. Invoices are important for keeping track of your income as a freelancer, so I strongly recommend you get into the habit of creating them.
An invoice is a detailed list of the services you have provided to a client that notes the costs and details for payment. Depending on your preferences, tax status, and location, an invoice may also include taxes, dates, your business address, and tax identification numbers. I’ll talk more about the specific things you need to include on an invoice later.
A professional invoicing system helps you (and your clients) keep track of your payments and finances. So, let’s take a closer look at how to make an invoice as a freelancer.
How To Make An Invoice As A Freelancer
1. Title
Every invoice should have a title to notify the client what the document is. It can be as simple as using the word ‘Invoice.’
2. Your Name And Information
Your name should be at the top of the invoice so that the client can quickly identify who sent it. If you have a freelancing business name, then you should use the name of your business and its logo.
Also add your contact details, including a phone number, address, and email. This allows the client to easily get in touch with you if they have any questions about the invoice.
3. Client’s Name And Information
Also list the client’s name, address, and contact information. Don’t be afraid to ask them for specific details they’d like you to include on the invoice.
4. Invoice Date
Next, add the date you are going to send the invoice. This is especially important for freelancers who have contracts requiring payment within a certain number of days after sending the invoice. But more generally, it helps you keep track of payments and follow up on any outstanding amounts.
5. Invoice Number
A unique invoice number is a requirement in some countries. It’s also just a useful way to manage your invoices. A simple way to create an invoice number is to combine the actual number of the invoice (i.e. is it the first one you’ve sent that client? The third?) with the initials of the client.
For example, if you’re sending an invoice to John Smith, the invoice number could be #001JS. However, this would only likely be useful for internal purposes. On the invoice itself, you may just include the number (omitting the client’s initials).
6. List Of Services Provided
Your invoice should include an itemized list of the services you provided to the client and the cost of each of them. For example, if you’re a freelance writer, you would list the title of the piece you wrote, the word count, your rate per word, and the total cost of the article.
This way a client knows exactly what they’re paying for. It also allows you to keep track of each individual piece of work and ensure you get paid for everything.
7. Total Amount Due
In this line, you should add up all the individual charges and let the client know how much they need to pay you in total. You should also add any additional charges such as taxes or apply any discounts you might be offering.
If you’re using invoicing software, it’ll do this for you. The same goes if you’re creating it in something like Excel, as there are formula functions you can use to streamline things.
8. Payment Details
Let the client know how you accept payment. Include any bank account details or PayPal information, depending on your and the client’s preferred payment method.
9. Thank You Note
While optional, I recommend you include a thank you note at the end of your invoice. It’s a simple way to end the invoice in a friendly manner. Ensure you personalize it to each client!
Freelancing Invoice Templates
We’ve already shared a few of our own freelancing invoice templates on the Freelance Ready blog. We have a free template for Microsoft Word, and we also have one for Microsoft Excel.
But there are lots of other great freelance invoice templates out there, including:
- Bonsai’s list of free templates
- Wise’s freelance invoice template
- PayPal’s invoice generator
- Smartsheet’s list of templates
- Invoice Simple’s templates
Remember that when you’re working with a free invoice template, you should still customize it to make it unique where possible. Clients won’t care all that much about how your invoice looks. But if you can add a bit of branding and unique design it can help you stand out and look more professional.
When Should You Send Your Freelance Invoice?
You can decide when to send your invoices as a freelancer, but there are a few general guidelines you can follow. For short-term or one-off freelance projects, you can invoice the client as soon as you’ve completed the work. This way you’ll be fresh in your client’s mind, and they’ll be more likely to pay the invoice promptly.
For long-term projects, you might set a regular invoice schedule. You can send weekly, monthly, or quarterly invoices. The client will often tell you their preferred invoicing frequency.
Invoicing For Larger Projects
For large or expensive projects, freelancers often require a partial payment before work commences. For example, you might issue an invoice to a client for 40% of the total project fee before you start working. Once you deliver the project, you then issue an invoice for the remaining 60%.
Ultimately, you decide how and when you issue your invoices (although you should respect your client’s preferences). Next, let’s discuss a few of the best invoicing tools for freelancers.
The Best Invoicing Tools For Freelancers
There are many ways freelancers can create and personalize their invoices. Some are free, while there are also lots of paid solutions. I’ll discuss a few of the most popular options below.
Bonsai
Bonsai is my top recommendation for those that need an invoicing solution that can also do a lot more for your freelancing business. They have lots of free invoice templates, and an invoice generator too.
But if you need other financial management tools like expense tracking, and even things like contract and proposal templates, it’s definitely worth considering.
Other Invoicing Software
Invoicing and accounting software like Freshbooks and Square simplify the creation and management of invoices. They offer different features, ranging from income and expense tracking to automatic invoice generation. Other options include the likes of Invoice Ninja and Wave.
PayPal
PayPal’s invoice feature allows you to quickly create and directly send an invoice to a client. This is a good choice if you use PayPal for your payments, or if it’s how your clients prefer to pay. You will need to bear in mind PayPal’s (sometimes hefty) fees if you take payments directly through the platform. You can create invoices with PayPal personal and business accounts.
Wise
Wise also offers invoicing tools for freelancers. The platform is similar to PayPal with a focus on money transfers, but their invoicing tool is pretty handy for freelancers too.
Other Tools
Google Docs, Microsoft Word, and Excel are other tools you can use to create your freelance invoices. Google Docs is a free solution, while Microsoft Word and Excel are also ‘free’ if you already have the Office suite of tools. I wouldn’t recommend paying for them just to create invoices though, as they’re not designed for that.
There are many other free invoicing tools at your disposal. But while they may be accessible choices, as your business grows you might find they’re not enough to manage your invoicing (as you may prefer a more automated solution). Some free tools also charge transaction fees, so keep that in mind when looking for the system that works best for you.
Now that you know more about the tools you can use to create an invoice, here are some final tips to help you appear even more professional when it comes to invoicing!
Tips For Invoicing As A Freelancer
Be Clear & Detailed
It’s important that your invoices are clear and detailed. Clients need to know exactly what they’re paying for. Be sure to include the necessary details in your invoice, but keep it simple.
The more complex you make your invoices, the more likely it is that there will be issues. Invoicing is nobody’s favorite part of freelancing, so make it as easy as possible for your client to pay for yours quickly!
Organization Is Key
Organize your invoices clearly so they’re easy to read. This way, at a quick glance, the client knows whose invoice it is and what work it’s for. Paying bills is bad enough – the last thing you want is a client feeling overwhelmed when looking at your invoice!
Break down your services into detailed line items on the invoice. Specify the quantity, unit price, and total for each item. This transparency helps your clients understand what they are paying for and reduces the likelihood of disputes.
Set Clear Payment Terms
Clearly state your payment terms on the invoice, including the due date and any late payment penalties or discounts for early payment. Make sure your clients understand when and how they should make the payment.
Ideally you’ll cover this kind of thing in your freelance contract. However, your client might have someone else processing their invoices, so it’s a good idea to include clear payment terms on the invoice itself as well.
If possible, offer various payment methods to make it convenient for your clients to settle the invoice. The easier it is for clients to pay, the quicker you’ll likely receive your money!
Say Thanks!
Finally, thank your client for choosing your services and trusting you and your work. You want to give them all the reasons to come back in the future or perhaps refer you to other potential clients.
Start Making Better Freelance Invoices
As a freelancer, invoicing is an important part of your business. It allows you to keep track of your income, but it also plays a role in your relationships with your clients.
There are lots of tools out there to help you create your invoices. Make sure you check what details you need to include in them, and keep the layout of your invoices clear and simple. By making it as easy as possible for your clients to pay you, they’re more likely to pay you correctly – and on time!
If you want to streamline your invoicing process, I recommend checking out Bonsai’s invoicing tools.
Freelance Ready is reader-supported. That means some links on this website are affiliate links. If you sign up or make a purchase through these links, we may earn a commission.

Raquel is a freelance writer with a knack for technology and a passion for science. She draws on her own years of freelance writing experience to craft articles for Freelance Ready on topics including freelancing on Fiverr and the popular blogging platform Medium.com. Learn more about Raquel here.